
Introduction to Red Velvet Poke Cake
If you’re a young professional looking to impress at your next gathering or simply treat yourself, Red Velvet Poke Cake might be the answer you've been searching for! This delightful dessert combines the classic flavors of red velvet cake with a creamy cheesecake filling and a light, whipped topping, creating a perfect balance of sweetness and richness.
Why is this dessert especially great for busy professionals? For one, it’s incredibly easy to make! With minimal prep time and straightforward instructions, you'll have a stunning cake ready in about 40 minutes. Plus, it can be made ahead of time—just pop it in the fridge to chill until you’re ready to dig in. No last-minute baking stress here!
Another perk? The vibrant red color and delicious flavor are sure to impress your friends or colleagues, turning any ordinary get-together into a special occasion. Whether you’re hosting a casual dinner or celebrating a milestone, this Red Velvet Poke Cake will have everyone talking. Check out our recipe below for a foolproof way to whip up this delectable treat, and get ready to indulge!
Why Red Velvet Poke Cake is the Perfect Dessert for Young Professionals
- Quick and Easy: This cake is a breeze to prepare, making it ideal for the busy lifestyle of a young professional.
- Impressive Presentation: Serve it in a beautiful dish, and watch your friends be impressed by your baking skills.
- Customizable Options: Feel free to add toppings or modifications to suit your taste, whether it’s fresh berries or more crushed Oreos.
For more delicious ideas and tips, be sure to explore trusted sources like Taste of Home or check out Epicurious for additional dessert inspirations!
Ingredients for Red Velvet Poke Cake
Essential ingredients for a tasty poke cake
Creating a delightful Red Velvet Poke Cake begins with a mix of essential ingredients that bring out rich flavor and texture. Here’s what you'll need:
- 1 box of red velvet cake mix: This is the base of your cake and provides that iconic red color.
- Eggs, oil, and water: Refer to the back of your cake mix box for specific amounts. These will ensure a moist and fluffy cake.
- 2 (3.4 ounce) boxes of instant cheesecake pudding (or vanilla): This creamy filling is vital for that lovely pudding layer that makes each bite irresistible.
- 4 cups of milk: Use this to mix with your pudding for a luscious consistency.
- 8 ounces of whipped topping (Cool Whip): A light and airy finishing touch to complement your cake.
Optional ingredients for customization
Customization is where the fun begins! Enhance your Red Velvet Poke Cake with these optional ingredients:
- Crushed Oreos: About 10 cookies can be sprinkled on top for a delicious crunch.
- Cream cheese frosting: For an extra creamy layer between the pudding and whipped topping.
- Sprinkles or chopped nuts: To add some color and texture to your cake.
Feel free to experiment and make this cake your own! What personal touches will you add to your Red Velvet Poke Cake? Check out this great article on cake customization for more inspiration!
Step-by-step Preparation of Red Velvet Poke Cake
Creating a delightful Red Velvet Poke Cake is fun and rewarding! Follow these helpful steps and enjoy the deliciousness that awaits.
Gather and prepare your ingredients
Before you dive into making this cake, it's essential to gather all your ingredients. You will need:
- 1 box of red velvet cake mix
- Ingredients specified on the cake mix box (usually eggs, oil, and water)
- 2 (3.4 ounce) boxes of instant cheesecake pudding (or vanilla, if you prefer)
- 4 cups of milk
- 8 ounces of whipped topping (like Cool Whip)
- Optional: 10 crushed Oreo cookies for that extra crunch
Prepare your workspace by clearing off your countertop and gathering mixing bowls, a whisk, a 9x13-inch baking dish, and a serving spoon. Organizing everything ahead of time makes the cooking process smoother and more enjoyable!
Make the red velvet cake
Follow the directions on the back of your red velvet cake mix box to whip up the batter. Combine the cake mix with eggs, oil, and water until all ingredients are well-blended. Pour the batter into your prepared baking dish and pop it into a preheated oven. Once baked to perfection (generally about 30 minutes), let it cool for a few minutes. This cooling period is crucial, as it will prepare the cake for the next exciting step!
Poke holes in the baked cake
After a brief cooling period, it's time to poke holes in your cake. Use the handle of a wooden spoon or a similarly-sized round object. Be generous and poke holes all the way to the bottom of the cake, spacing them about an inch apart. This step is where the magic happens, allowing the creamy filling to seep into the cake, making it irresistibly moist.
Prepare the cheesecake filling
In a separate bowl, whisk together the instant cheesecake pudding and the 4 cups of milk. Keep whisking until the mixture is smooth and lump-free. This creamy filling is key to transforming your Red Velvet Poke Cake into a decadent dessert.
Pour the filling over the cake
Carefully pour the cheesecake filling over the warm, poked cake, making sure it seeps into all those holes you created. Use the back of a spoon to gently spread the filling and push it into the holes, ensuring every bite of cake is infused with that creamy goodness.
Chill and add the whipped topping
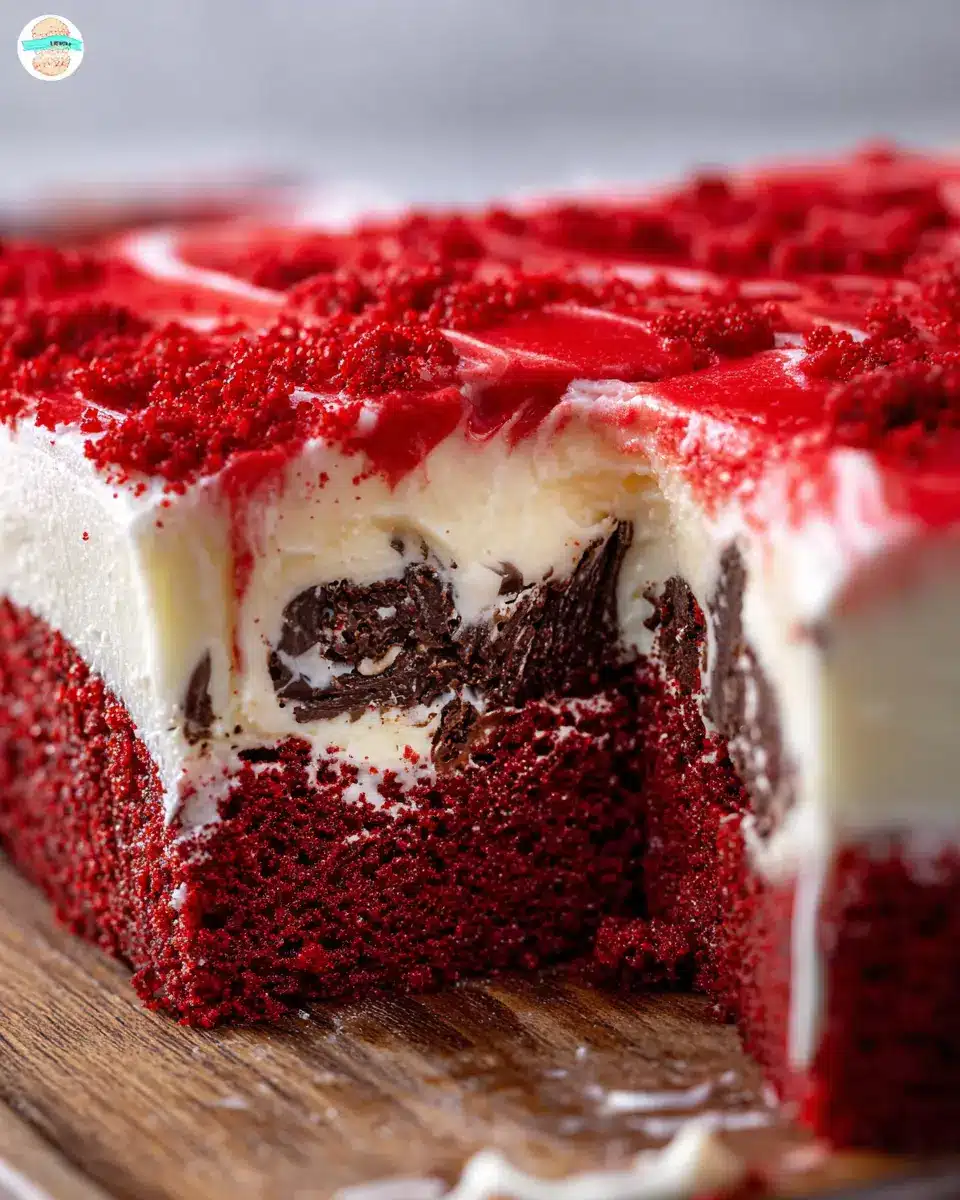
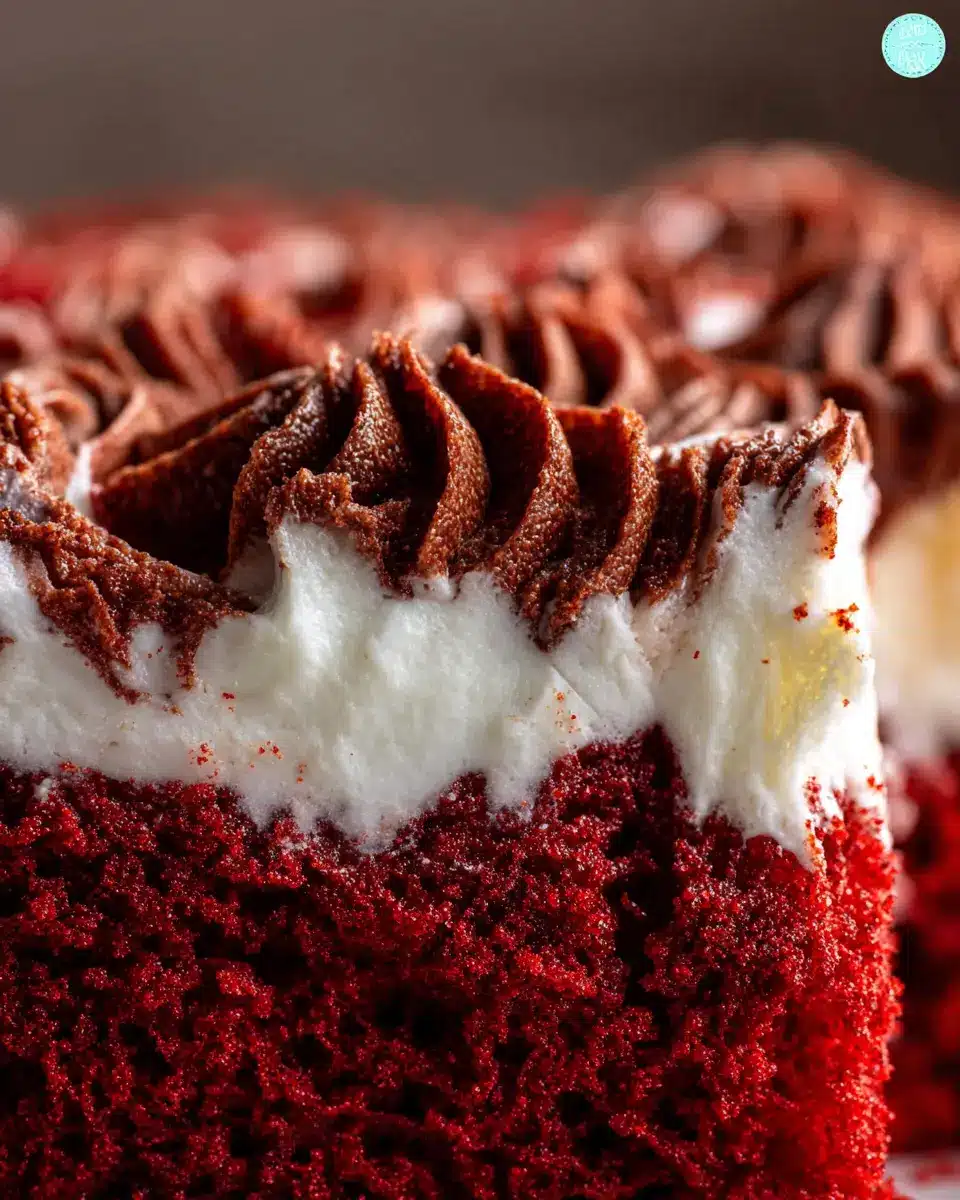
Next, it's time to let your cake chill in the refrigerator for about two hours. This waiting period allows the filling to set and gives the cake a delicious, cohesive flavor. Once chilled, remove it from the fridge and spread the whipped topping evenly over the cheesecake filling. A generous layer of whipped topping adds a light and creamy texture that complements the richness of the cake.
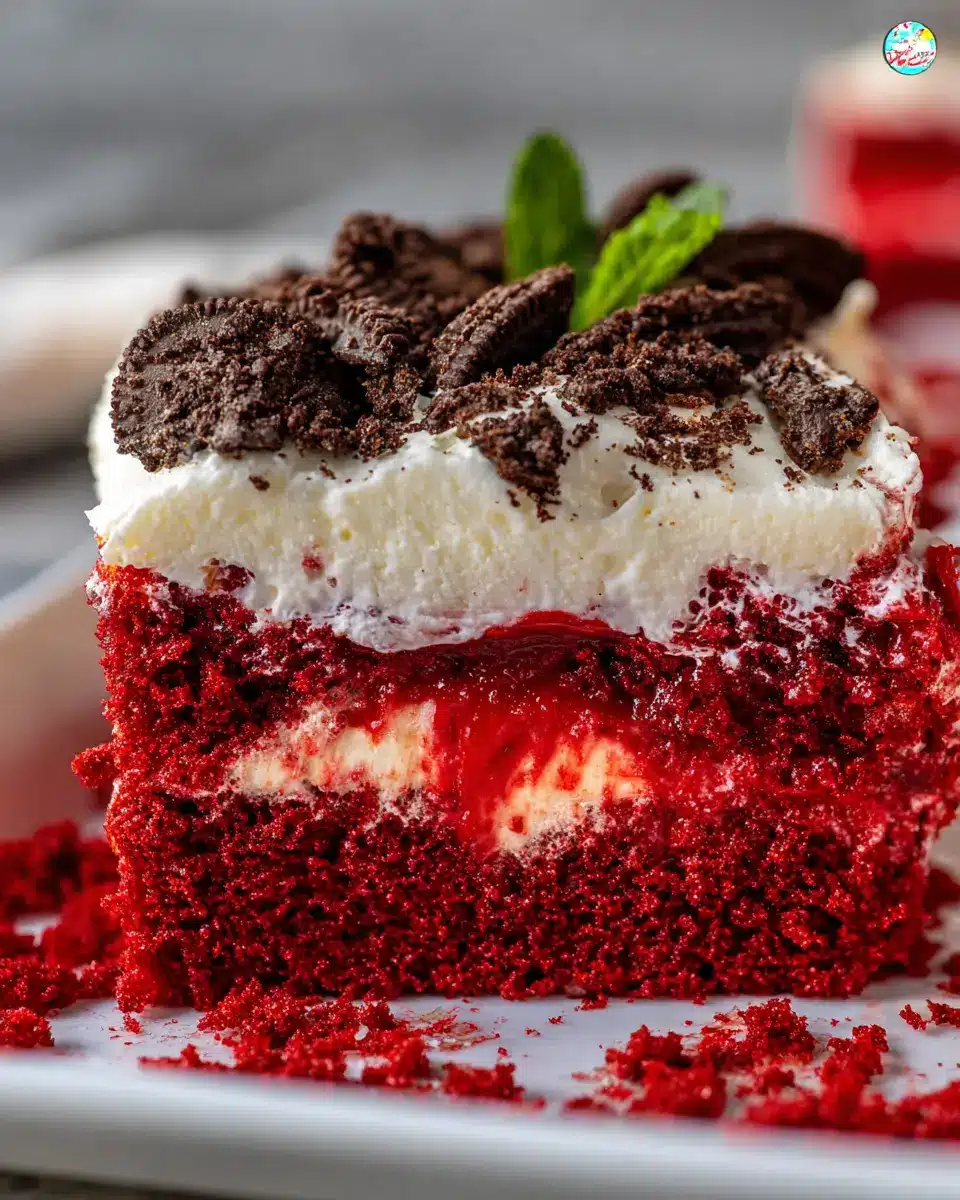
Top with crushed Oreos
For that extra layer of crunch and flavor, sprinkle the crushed Oreo cookies on top of the whipped cream. This delightful addition not only looks appealing but also adds a delightful contrast to the soft cake and filling underneath. Slice into your masterpiece and indulge in a slice of happiness!
Enjoy your Red Velvet Poke Cake with family and friends, pairing it with a cup of your favorite coffee or a refreshing glass of iced tea for a delightful dessert experience!
Variations on Red Velvet Poke Cake
Adding a Berry Twist
Why not mix things up with a fruity twist to your Red Velvet Poke Cake? Incorporate fresh berries like strawberries or raspberries into the cheesecake pudding to create a luscious berry flavor. You can even swirl in some berry puree for an eye-catching design. The tartness of the berries beautifully balances the sweetness of the cake, making every bite an absolute delight. For an extra touch, top your cake with whole berries for a stunning presentation.
Gluten-Free Red Velvet Option
If you’re looking for a gluten-free version of Red Velvet Poke Cake, simply swap the traditional cake mix with a gluten-free red velvet mix. Many brands offer superb options that taste just as delicious. Ensure you use gluten-free instant pudding, and you'll have a cake that everyone can enjoy, regardless of dietary restrictions. Pair it with gluten-free cookies or crumbled nuts for extra texture on top. This way, you can indulge guilt-free!
For more variations and tips, check out Gluten-Free Baking or explore berry recipes at Berry Recipes.
Cooking Tips and Notes for Red Velvet Poke Cake
Keeping the Cake Moist
To ensure your Red Velvet Poke Cake remains moist and delicious, consider the following tips:
- Don't overbake: Keep a close eye on the cake while it’s in the oven. Start checking a few minutes before the suggested baking time.
- Poke wisely: Make larger holes with your utensil to allow the cheesecake pudding mixture to seep into every delicious part of the cake.
Whipped Topping Alternatives
If you're looking for alternatives to traditional whipped topping, try these options:
- Homemade Whipped Cream: Beat heavy cream with a bit of sugar and vanilla for a light, fluffy topping.
- Greek Yogurt: For a healthier twist, use Greek yogurt mixed with a touch of honey or maple syrup to balance flavors.
These substitutes can enhance your cake while adding a personal touch! For more ideas, explore recipes on King Arthur Baking or Dessert for Two.
Serving Suggestions for Red Velvet Poke Cake
Perfect Pairings with Teas and Coffees
When enjoying your Red Velvet Poke Cake, consider pairing it with a warm cup of chai or a bold espresso. The rich, creamy flavor of the cake beautifully complements the spices of chai, while an espresso adds a touch of bitterness that balances the sweetness. You can even try a smooth vanilla latte for a delightful experience.
Fun Serving Ideas for Gatherings
This cake is a showstopper, perfect for parties and gatherings. Serve it in individual cups or mason jars for a fun twist, making it easy for guests to enjoy. Add fresh berries or a drizzle of chocolate syrup on top to elevate the presentation. For a lovely brunch option, try serving it with flavored cream cheese spreads alongside warm biscuits or scones.
By incorporating these serving suggestions, you're sure to impress your guests and make any occasion even more memorable!
Time Breakdown for Red Velvet Poke Cake
Preparation Time
Get your hands dirty in just 10 minutes! This quick prep stage sets the tone for your delicious creation, where you’ll gather ingredients and mix your red velvet cake.
Cooking Time
Devote 30 minutes to let your oven work its magic. This is the time when your red velvet poke cake rises to perfection!
Total Cooling Time
Once baked, let it cool in the fridge for about 2 hours to ensure the pudding sets beautifully. Trust us, the wait will be worth it when you finally take a slice!
For more tips on baking delicious cakes, check out our article on cake baking essentials.
Nutritional Facts for Red Velvet Poke Cake
Estimated calories per serving
Indulging in a slice of Red Velvet Poke Cake comes with approximately 306 calories per serving. This makes it a delightful treat without completely derailing your daily caloric goals.
Sugar and fat content
When it comes to sugar and fat, this cake contains about 26 grams of sugar and 13 grams of fat per serving. It’s sweet without being overly sugary, making it perfect for satisfying that dessert craving! For those watching their sugar intake, perhaps consider reducing the amount of crushed Oreos on top.
Looking for a great way to enjoy this delicious dessert without the guilt? Check out more about manageable portion sizes at Healthline. Enjoy your baking adventures!
FAQs about Red Velvet Poke Cake
Can I make this cake ahead of time?
Absolutely! You can prepare your Red Velvet Poke Cake a day in advance. Just follow the recipe as usual, then cover it tightly and store it in the refrigerator. This not only saves time but also allows the flavors to meld beautifully, making each bite even more delicious.
What can I use instead of Oreos?
If Oreos aren't your thing or you have dietary restrictions, you have plenty of alternatives. Try crushed graham crackers, chocolate wafer cookies, or even crushed pistachios for a nutty twist. These options add unique textures and flavors, keeping your p poke cake exciting and delicious.
How to store leftover poke cake?
To keep your Red Velvet Poke Cake fresh, just cover it with plastic wrap or foil and place it in the refrigerator. It should last for about 3 to 4 days. For best results, avoid leaving it at room temperature for too long to maintain its creamy goodness.
Feel free to explore more about baking techniques and tips at resources like The Kitchn and Food Network!
Conclusion on Red Velvet Poke Cake
Final thoughts on indulging in this delightful treat
As you embark on your Red Velvet Poke Cake journey, remember that desserts like this are meant to be shared and enjoyed. Each slice offers a harmonious blend of rich flavors and creamy textures that’s perfect for gatherings. Don't hesitate to customize with your favorite toppings, and feel free to enjoy a piece (or two) while making it! Happy baking!

Red Velvet Poke Cake
Equipment
- oven
- 9x13-inch Baking Dish
- Medium bowl
Ingredients
Cake
- 1 box red velvet cake mix
- 3 large eggs use amounts on back of box
- ½ cup oil use amounts on back of box
- 1 cup water use amounts on back of box
Filling and Topping
- 2 3.4 ounce boxes instant cheesecake pudding or vanilla
- 4 cups milk
- 8 ounces whipped topping thawed (Cool Whip)
- 10 pieces Oreo cookies crushed (optional)
Instructions
Preparation
- Prepare 1 box red velvet cake mix with ingredients needed to make cake: eggs, oil & water to package directions for a 9×13-inch cake. Allow to cool for just a few minutes.
- With a wooden spoon handle or a similarly-sized round object, poke holes in the warm cake to allow pudding to seep in.
- In a medium bowl, whisk together 2 boxes instant cheesecake pudding with 4 cups milk until no lumps remain.
- Pour pudding over the cake, aiming to fill the holes.
- Spread pudding evenly and push down into holes gently with a spoon.
- Refrigerate the cake to set and cool for about 2 hours.
- Once cooled, spread the 8 ounce tub of whipped topping evenly over the pudding layer.
- Top with the crushed Oreo cookies. Slice and serve!

Leave a Reply