
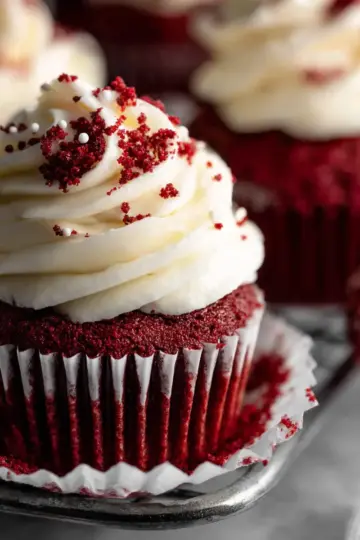
Introduction to Black Velvet Cake
Why you’ll love this Black Velvet Cake
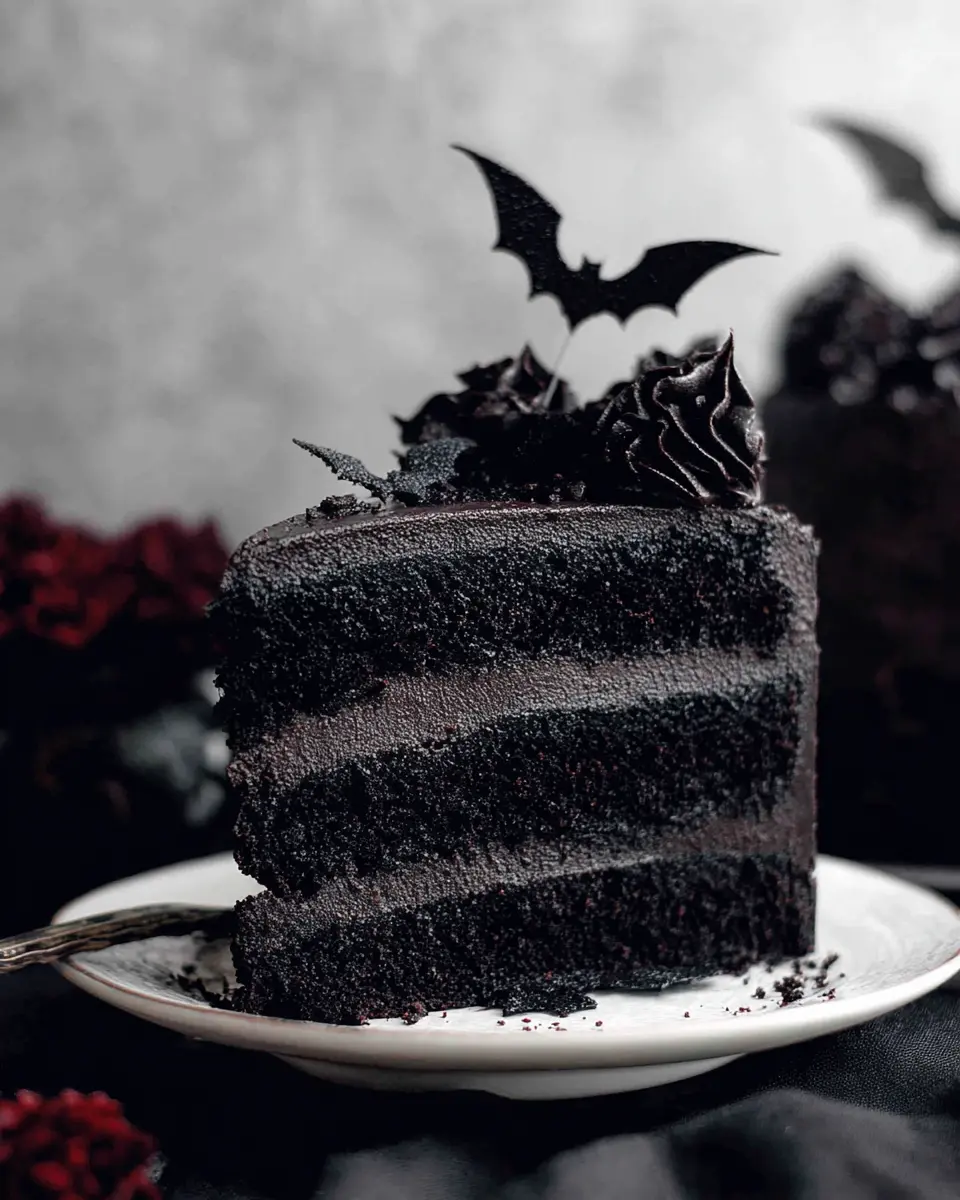
Have you ever tried a cake so rich and delightful that it instantly transports you to a place of pure happiness? That’s exactly what this Black Velvet Cake does! With its deep, dark hue, this showstopper boasts a unique twist on classic flavors that’s perfect for any occasion—especially Halloween. Picture a moist, velvety crumb paired with just the right amount of sweetness, making every bite utterly satisfying.
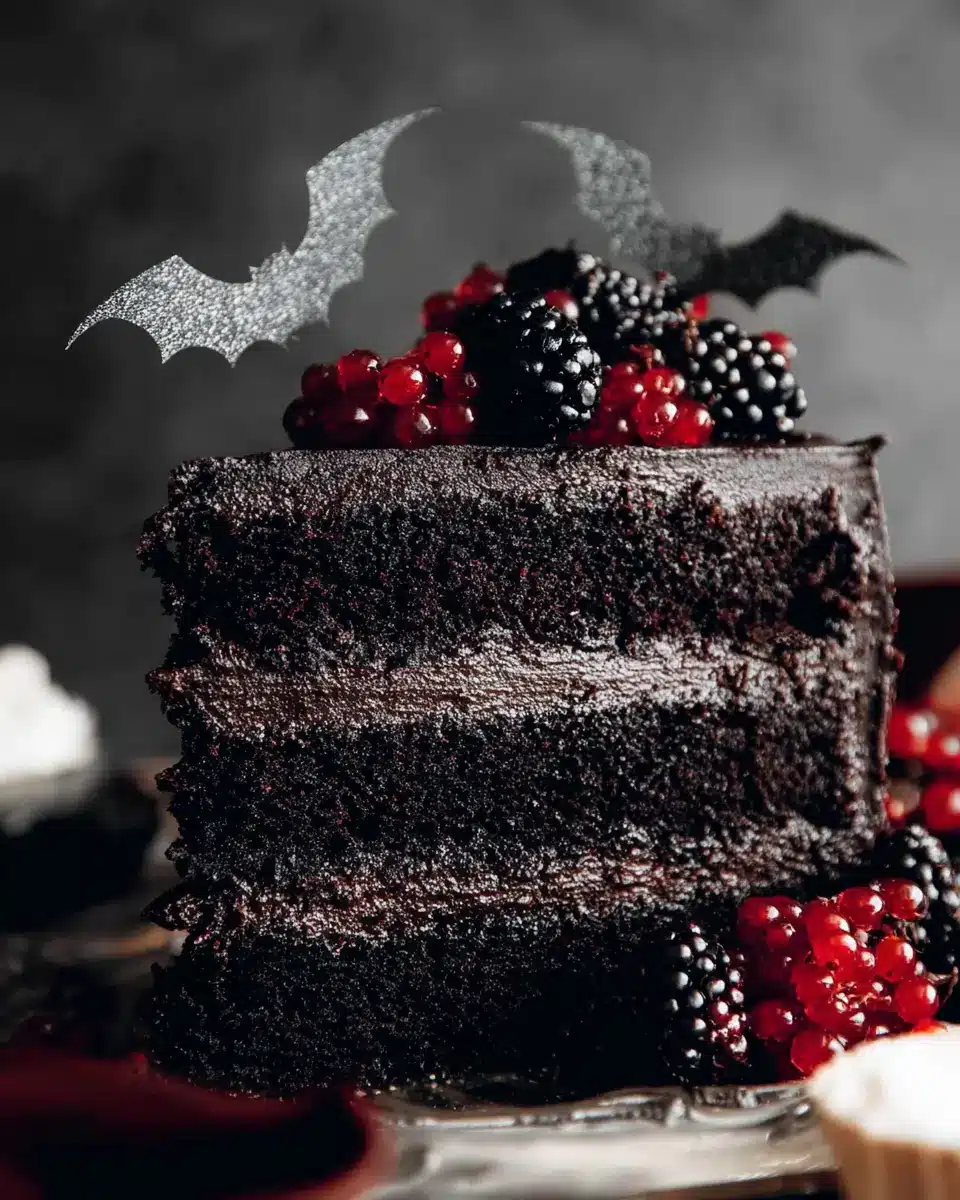
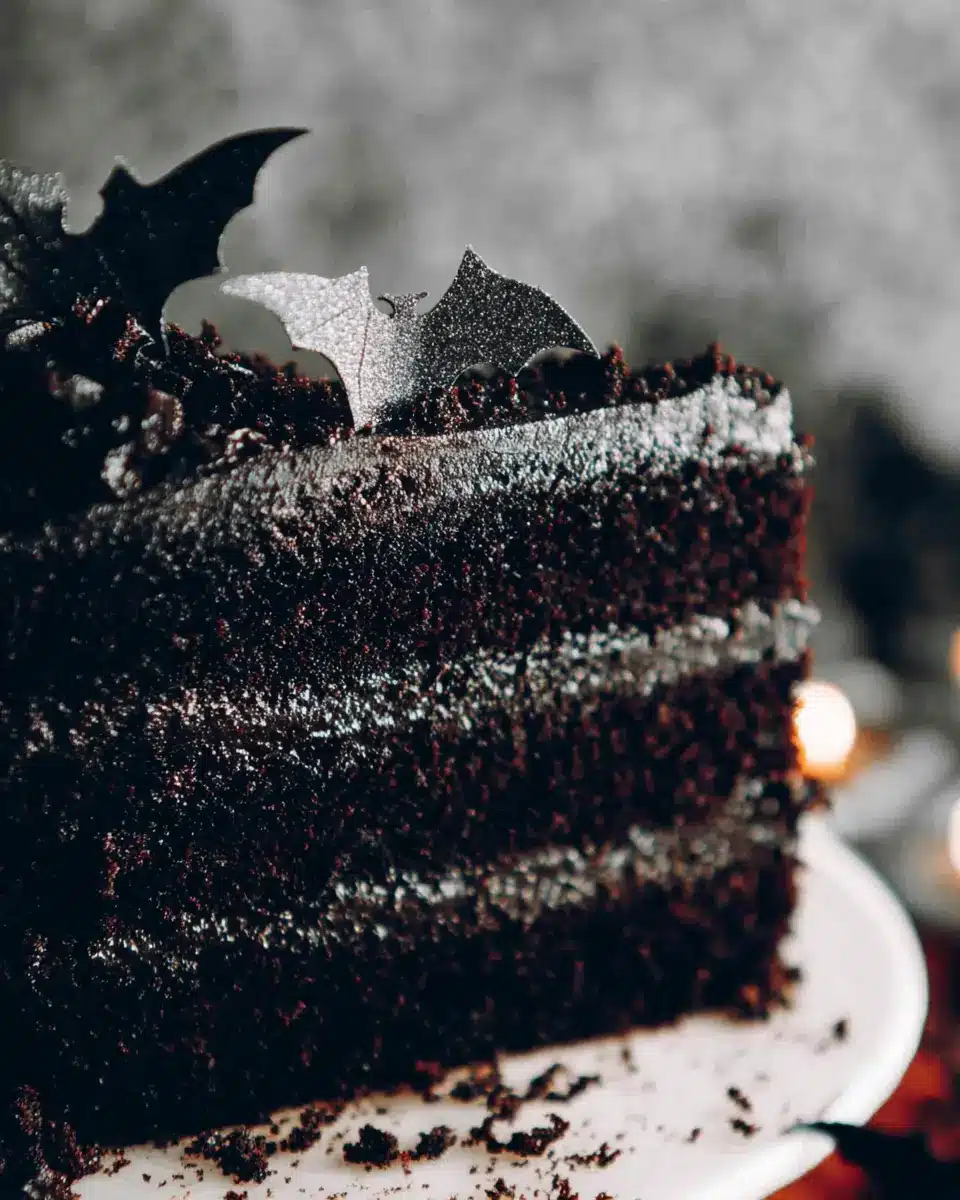
What sets this cake apart are the black cocoa powder and the luscious black cocoa buttercream, which create a striking visual contrast when decorated with white splashes and whimsical bats. It’s not just a cake; it’s an experience! Whether you’re a seasoned baker or a kitchen novice, the blend of straightforward ingredients and simple steps makes it perfectly approachable.
Did you know that black cocoa powder has a unique flavor profile that’s less bitter than traditional cocoa? This adds to the overall depth of flavor in your Black Velvet Cake. Also, the cake's decoration is a fun project that you can enjoy with friends or family! So, roll up your sleeves and let’s create a masterpiece that’s as delicious as it is visually stunning. Do you smell the cake baking already? Let's dive into the recipe!
Ingredients for Black Velvet Cake
Essential Ingredients for the Cake
To create the moist and decadent layers of Black Velvet Cake that you’re sure to love, you'll need:
- ⅔ cup black cocoa powder
- 2 cups all-purpose flour
- 1 ½ cups granulated sugar
- ½ teaspoon salt
- 1 teaspoon baking soda
- 1 ½ cups vegetable or canola oil
- 1 cup buttermilk (room temperature)
- 1 tablespoon white vinegar
- 2 large eggs (room temperature)
- 2 teaspoon vanilla extract
These ingredients combine for a rich flavor that perfectly balances sweetness and decadence, making it especially perfect for celebrations.
Ingredients for Black Cocoa Buttercream
The creamy black cocoa buttercream elevates this cake to a whole new level. You’ll need:
- 1 cup unsalted butter (room temperature)
- 1 cup vegetable shortening
- 2-3 cups powdered sugar
- 1 ½ cups black cocoa powder
- 1 teaspoon vanilla extract
Using black cocoa powder creates that signature dark hue and deep flavor that distinguishes this buttercream.
Optional Decorations for Added Flair
To enhance your Black Velvet Cake visually, consider adding some fun decorations. These options will give your cake an enchanting touch:
- White food coloring for splatters
- A ¾″ flat paintbrush for application
- White nonpareil sprinkles for a festive touch
- Flying paper bats to capture that spooky vibe
- 26 gauge floral wire for positioning decorations
With these ingredients and decorations, your Black Velvet Cake will not only taste amazing but also look stunning and festive!
Step-by-Step Preparation of Black Velvet Cake
Creating your very own Black Velvet Cake is a fantastic way to impress your friends and family, especially during spooky seasons like Halloween. Let’s dive into the prep work to ensure your cake turns out moist, rich, and utterly delicious.
Prepping the Cake Pans
The first step to a successful Black Velvet Cake is preparing your cake pans. Preheat your oven to 350°F (175°C). Spray three 6-inch round cake pans with nonstick spray. For a foolproof finish, line the bottoms with parchment paper. If you happen to have cake strips, consider using them to help your cakes bake evenly, preventing doming.
Mixing the Dry Ingredients
In a large mixing bowl, whisk together your dry ingredients. Combine:
- ⅔ cup black cocoa powder (this is what gives your cake its deep flavor!)
- 2 cups all-purpose flour
- 1 ½ cups granulated sugar
- ½ teaspoon salt
- 1 teaspoon baking soda
This mixture sets the foundation of rich flavors that make the cake unforgettable.
Combining Wet Ingredients
In a separate bowl, mix together your wet ingredients. This includes:
- 1 ½ cups vegetable or canola oil
- 1 cup buttermilk (room temperature, makes a difference!)
- 1 tablespoon white vinegar
- 2 large eggs (also room temperature for the best texture)
- 2 teaspoons vanilla extract
Whisk until smooth, and don’t skip on the vanilla—it adds a lovely depth to the cake.
Creating the Batter
Now, slowly pour your wet mixture into the dry ingredients while whisking continuously. As the batter starts to thicken, switch to a rubber spatula and fold until everything is combined and smooth. This gentle combining keeps your cake layers light and airy!
Baking the Cake Layers
Once your batter is ready, pour it evenly into the prepared cake pans. Bake for about 35-40 minutes, or until a toothpick inserted into the center comes out clean. Keep an eye on it, as all ovens can vary slightly!
Cooling the Cakes
After baking, allow the cakes to cool in the pans for about 20 minutes. Then, carefully turn them out onto a cooling rack. If you're decorating the same day, place them uncovered in the refrigerator for about an hour to firm up. If not, just wrap them in plastic wrap and chill for up to two days to keep them fresh.
Making Black Cocoa Buttercream
While the cakes cool, it’s time to whip up that luscious black cocoa buttercream! In a mixing bowl, beat together:
- 1 cup unsalted butter (room temp)
- 1 cup vegetable shortening
Once combined, gradually mix in 2-3 cups of powdered sugar and 1 ½ cups of black cocoa powder, finally adding 1 teaspoon of vanilla extract. If your frosting is too thin, add more powdered sugar until you reach your desired consistency.
Assembling the Cake
Now comes the fun part! Level the tops of your cooled cakes if needed. Spread a generous layer of buttercream between each layer. Chill the assembled cake in the refrigerator for about 20 minutes; this helps it hold shape when frosting the outside.
Decorating the Cake
Once chilled, frost the entire cake with the remaining buttercream. Add your flair with splatters of white food coloring and some festive touches like white nonpareil sprinkles or flying bat decorations.
Take your time with this; decorating is just as important as baking!
With every step carefully executed, your Black Velvet Cake will undoubtedly be the centerpiece of any gathering. Enjoy your culinary creation!
Variations of Black Velvet Cake
Adding a twist: Different frosting options
While the black cocoa buttercream is a standout choice, why not experiment? Consider a creamy cream cheese frosting for a tangy complement to the cake's richness. Alternatively, a light whipped ganache can add an indulgent touch. If you're after a bit of color, a fluffy vanilla or orange buttercream can create stunning contrast and flavor harmony.
Incorporating unique flavors
Elevate your Black Velvet Cake by incorporating unexpected flavors. A hint of espresso can enhance the chocolate notes, making each bite even richer. For a fruity twist, mix in some orange or cherry zest for a refreshing kick. You could also replace the vanilla extract with almond or hazelnut for a nutty aroma that beautifully complements the chocolate. Let your creativity shine!
Cooking Tips and Notes for Black Velvet Cake
Making Your Own Buttermilk
Don’t worry if you’re out of buttermilk—making your own is super easy! Simply take 1 cup of whole milk and remove 1 tablespoon. Add 1 tablespoon of white vinegar, give it a quick stir, and let it sit for about 10 minutes until it thickens. This homemade version works great for the Black Velvet Cake and will still deliver that necessary tanginess.
Choosing the Right Cake Pans
For even baking and easy removal, 6-inch round pans are ideal for this layered Black Velvet Cake. You can also use 8 or 9-inch pans, just be aware they may need a shorter bake time—around 30-35 minutes. If you have them, consider using cake strips to ensure a flat, evenly baked top! This little addition will help avoid overcooking the edges while keeping the center perfectly moist.
Serving Suggestions for Black Velvet Cake
Pairing with Desserts
When serving your Black Velvet Cake, consider complementing it with a scoop of vanilla bean ice cream or a dollop of whipped cream to balance its rich flavor. For a more indulgent experience, serve it alongside chocolate mousse or chocolate truffles. Not only do these pairings enhance the cake's chocolate notes, but they also create a delightful contrast in texture.
Best Beverages to Enjoy with the Cake
To truly elevate the enjoyment of your Black Velvet Cake, think about pairing it with a steaming cup of rich coffee or a creamy hot chocolate. Alternatively, a glass of cold milk or a refreshing iced coffee can also be delicious companions. For those who prefer tea, a smooth chai or Earl Grey will harmonize beautifully without overpowering the cake’s decadent essence.
Time Breakdown for Black Velvet Cake
Planning to create a stunning Black Velvet Cake? Here’s your handy time breakdown to keep things on track!
Preparation Time
Set aside about 20 minutes to gather your ingredients and whip up the batter. It’s a breeze!
Baking Time
You'll need to bake your cakes for 35-40 minutes. Just keep an eye on them and do the toothpick test.
Chilling Time
Once cooled, allow your cakes to chill for 1 hour. This step is vital for easy decorating.
Total Time
In total, you’re looking at approximately 2 hours and 30 minutes, including prep, baking, and chilling. Perfect for a cozy baking session!
Nutritional Facts for Black Velvet Cake
Calories per slice
Each slice of this Black Velvet Cake contains approximately 350 calories, allowing you to enjoy a decadent dessert without too much guilt. Serving size can influence calorie intake, so consider slicing the cake into 10 pieces for a more indulgent treat.
Protein content
You can expect about 3 grams of protein per slice, primarily from the eggs and buttermilk in the recipe. While this isn't a significant source of protein, it does contribute to the cake's overall richness and texture.
Sugar content
With around 25 grams of sugar per slice, this cake is definitely on the sweeter side. The balance of sweetness complements its chocolaty flavor, making it a delightful choice for special occasions like Halloween or birthdays. For a healthier option, consider using a sugar substitute or reducing the amount of sugar in the frosting.
If you’re interested in diving deeper into nutritional facts of cakes, websites like Healthline and Eat This, Not That can provide more insights into making healthier choices while still enjoying delicious desserts!
FAQs about Black Velvet Cake
How can I store leftover Black Velvet Cake?
Leftover Black Velvet Cake can be a delightful treat for days! Store it in an airtight container at room temperature for up to two days. If you need to keep it longer, wrap the cake in plastic wrap and refrigerate it for up to a week, or freeze individual slices for up to three months. Just remember to let it thaw in the fridge before indulging!
Can I make this cake ahead of time?
Absolutely! You can bake the layers a couple of days in advance. Once cooled completely, just wrap them tightly in plastic wrap and refrigerate. This not only stores them but also allows the flavors to deepen. You can frost the cake on the day you plan to serve it for maximum freshness.
What’s the difference between black cocoa and regular cocoa?
Black cocoa is a highly alkalized cocoa powder that results in a darker and more intense flavor compared to regular cocoa. This makes it perfect for giving your Black Velvet Cake that rich, dark color. Plus, the distinct taste enhances the cake’s overall appeal. If you’re curious, check out this insightful article for more on cocoa powders!
Conclusion on Black Velvet Cake
Embrace the homemade magic of Black Velvet Cake
Baking a Black Velvet Cake is more than creating a dessert; it's about crafting memories. This cake's rich flavors and striking appearance make it an unforgettable treat for any occasion. So, gather your ingredients, channel your inner baker, and experience the joy of homemade magic. Trust us; it’s worth every bite!

Black Velvet Cake
Equipment
- 6-inch round cake pans
- Mixing Bowls
- Hand mixer or stand mixer
- Whisk
- rubber spatula
- Cooling Rack
- Nonstick spray
- Parchment paper
- Flat paint brush
Ingredients
Black Velvet Cake
- ⅔ cup black cocoa powder 60g
- 2 cups all purpose flour 250g
- 1 ½ cups granulated sugar 300g
- ½ teaspoon salt
- 1 teaspoon baking soda
- 1 ½ cups vegetable or canola oil 325ml
- 1 cup buttermilk room temp, 235ml
- 1 tablespoon white vinegar
- 2 large eggs room temp
- 2 teaspoon vanilla extract
Black Cocoa Buttercream
- 1 cup unsalted butter room temp, 220g
- 1 cup vegetable shortening 210g
- 2-3 cups powdered sugar 240g – 360g
- 1 ½ cups black cocoa powder 150g
- 1 teaspoon vanilla extract
Decorations (optional)
- White food coloring
- ¾" flat paint brush
- White nonpareil sprinkles
- Flying paper bats
- 26 gauge floral wire
Instructions
Black Velvet Cake
- Preheat the oven to 350F and spray (3) 6" round cake pans with nonstick spray and line the bottoms with parchment paper.
- In a large bowl, whisk together the cocoa powder, flour, sugar, salt, and baking soda.
- In a separate bowl, whisk together the oil, buttermilk, vinegar, eggs, and vanilla.
- Slowly pour the wet ingredients into the dry ingredients as you whisk to combine. Switch to a rubber spatula about halfway through as the batter thickens. Fold the batter until smooth.
- Pour into your cake pans and bake for 35-40 minutes, or until a toothpick in the center comes out clean.
- Allow the cakes to cool in the pans for about 20 minutes. Then turn them out onto a cooling rack and peel off the parchment paper.
- If you plan on decorating the cakes the same day, place them into the refrigerator uncovered to chill for about 1 hour.
- If you will be decorating at a later day, allow the cakes to cool completely at room temperature, then wrap each in plastic wrap and chill for up to 2 days.
Black Cocoa Buttercream
- In a large mixing bowl using a hand or stand mixer with the whisk attachment, cream together the butter and shortening until smooth and combined.
- Mix in the powdered sugar, 1 cup at a time, and then the black cocoa powder. Finally add in the vanilla.
- If the batter is still too thin, add another cup of powdered sugar.
Assemble and Decorate
- Once the cakes have completely cooled, level off the tops if needed.
- Spread an even layer of buttercream between each cake and then allow the cake to chill for about 20 minutes.
- Once set, use the remaining frosting to cover the entire cake.
- Place the cake back in the refrigerator once more to let the frosting set.
- While it chills, prepare the decorations.
- For the splatters, combine 1 teaspoon of white food coloring with about ½ teaspoon of water in a small dish.
- For the bats, cut 6 pieces of wire about 6-7 inches long and stick them on to the ends of each wire.
- Now that the cake is chilled, begin by adding the white splatters.
- Lightly dip the tip of your brush into the white food coloring and place the brush about an inch away from the cake.
- Use your finger to run it across the tip of the brush, flicking the food coloring onto the cake.
- Repeat this process all around the cake.
- Next, toss little pinches of the white sprinkles against the sides of the cake.
- Finally, stick the bats into the top of the cake.
- Slice and serve!
Leave a Reply