
Introduction to Easter Peeps Cupcakes
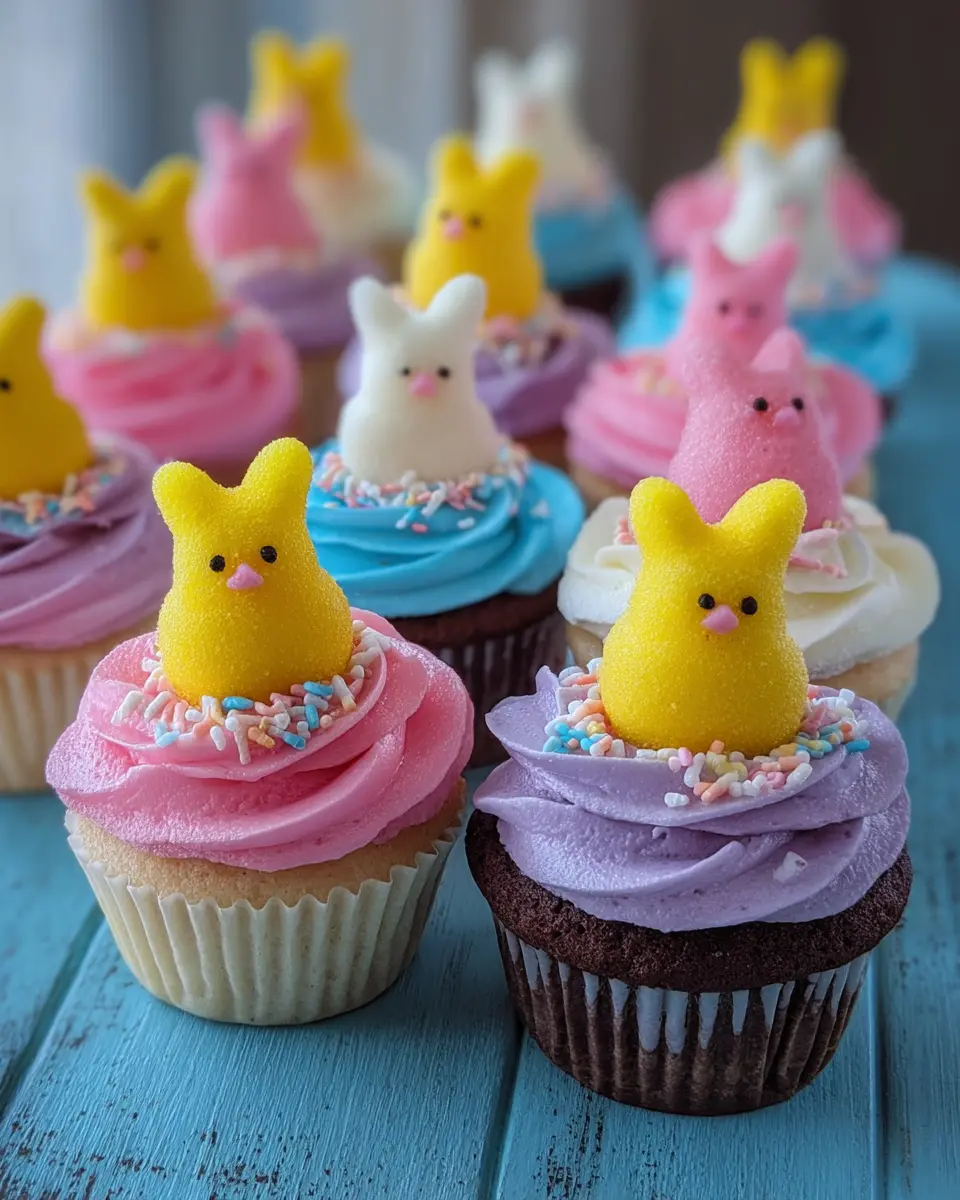
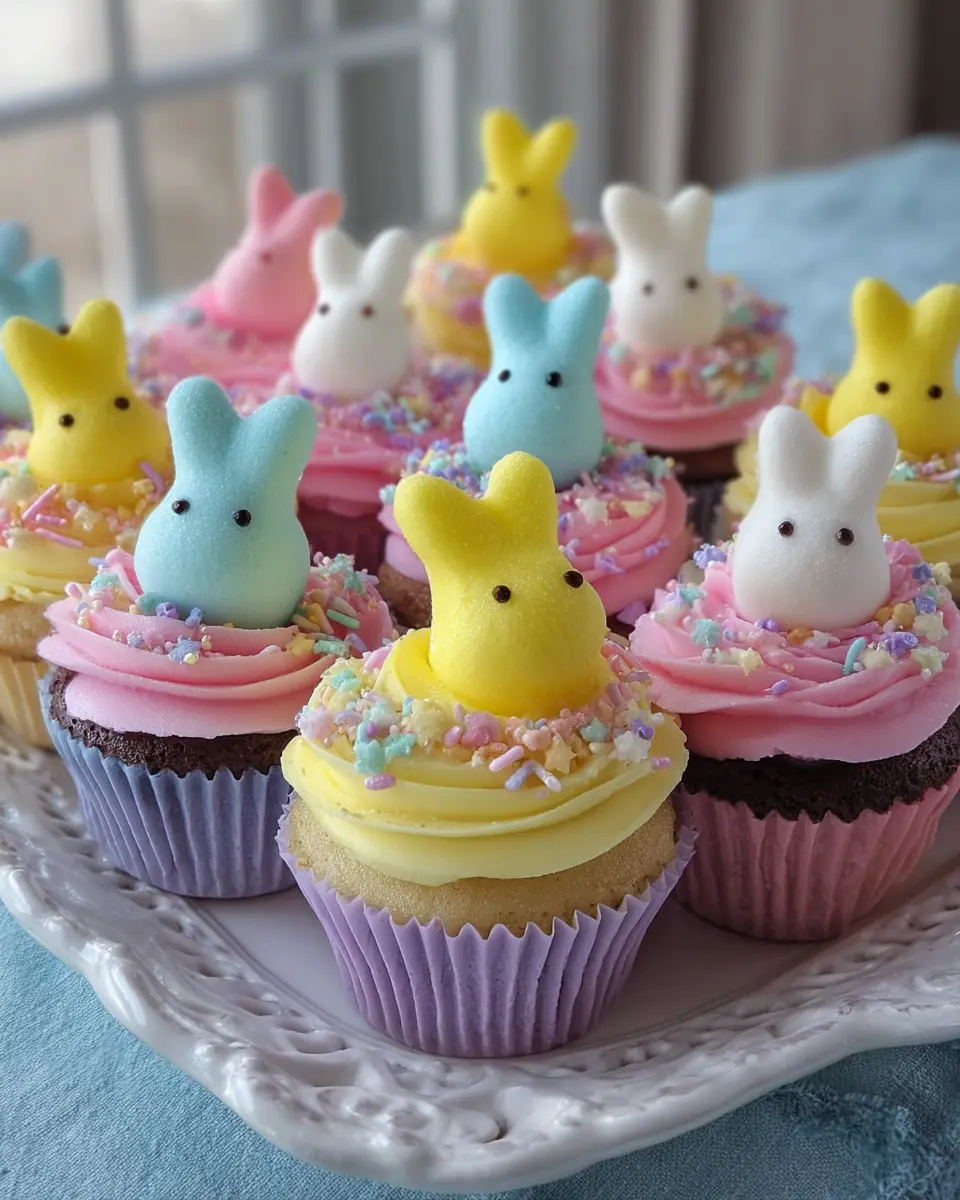
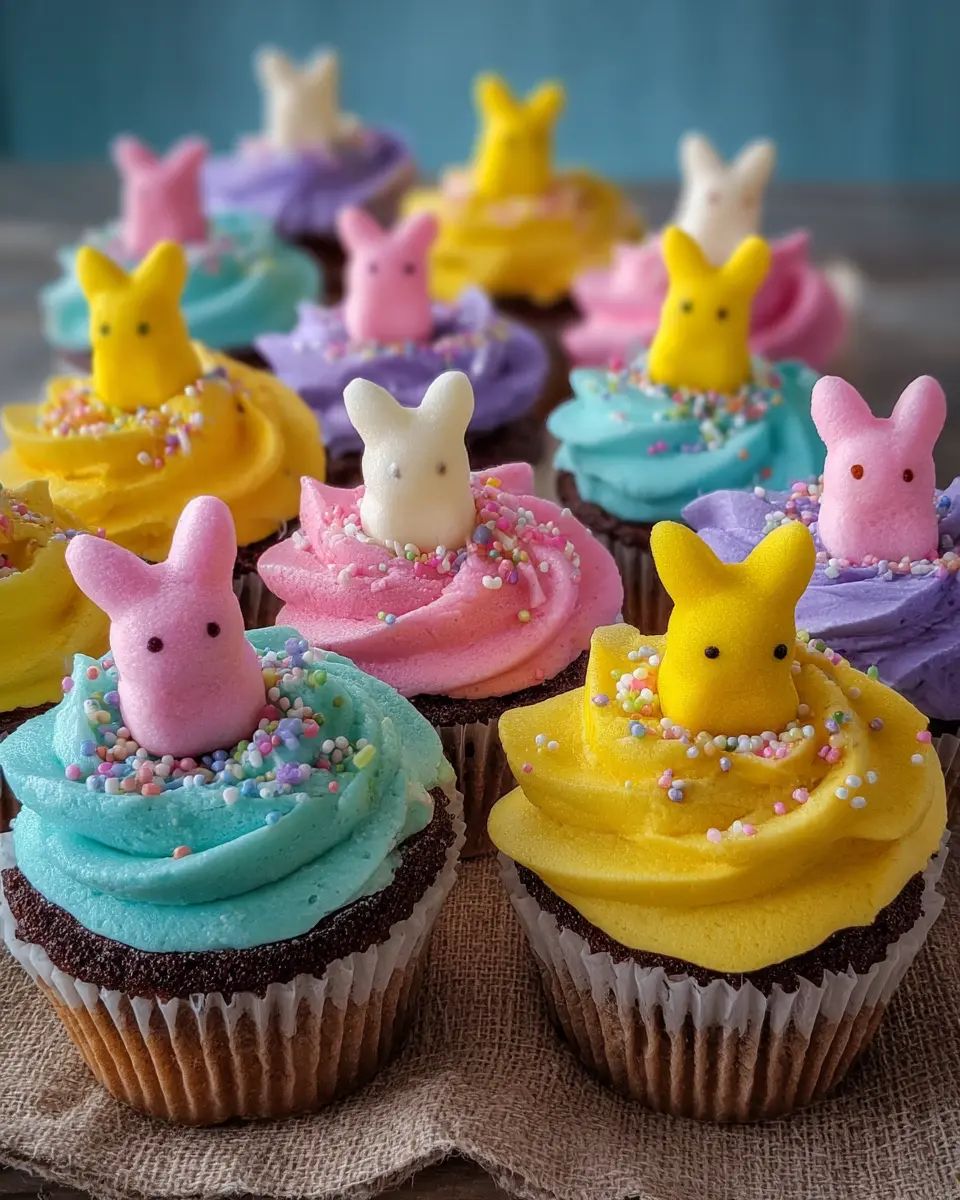
Spring is a season of renewal, joy, and, of course, delicious treats! Easter Peeps Cupcakes bring all the cheerful vibes of the holiday to life with their soft chocolate base, fluffy pastel frosting, and adorable marshmallow bunnies perched on top. These whimsical desserts are not only a feast for the eyes but also a delightful way to elevate your Easter brunch or spring gathering.
One of the reasons why Easter Peeps Cupcakes are the perfect treat for spring celebrations is their playful nature. These cupcakes combine familiar flavors with the fun, nostalgic charm of Peeps candy, which many people associate with childhood Easter traditions. As you whip up this simple recipe, consider how it can spark joy and conversation among family and friends, creating lasting memories. Besides, baking with loved ones can really make the experience special, turning a routine task into a delightful bonding activity.
For added inspiration and tips on hosting an unforgettable spring gathering, check out expert advice from sites like The Kitchn and Food Network for decorating ideas and seasonal trends. Get ready to dive into the fun with our easy 10-step guide to creating your own Easter Peeps Cupcakes!
Ingredients for Easter Peeps Cupcakes
Baking Easter Peeps Cupcakes is a delightful way to brighten up your spring celebrations! Let’s explore what you’ll need to create these festive treats, starting with the essentials for the chocolate cupcakes.
Essential Ingredients for the Chocolate Cupcakes
To whip up the soft and fudgy chocolate base, you’ll need:
- 1 cup all-purpose flour
- ½ cup unsweetened cocoa powder
- ¾ cup granulated sugar
- 1 teaspoon baking soda
- ½ teaspoon baking powder
- ¼ teaspoon salt
- 1 large egg
- ½ cup buttermilk
- ½ cup warm water or hot coffee (it’s a game changer)
- ¼ cup vegetable oil
- 1 teaspoon vanilla extract
These ingredients come together to deliver a rich chocolate flavor that pairs perfectly with your whimsical frosting!
Ingredients for the Fluffy Vanilla Buttercream
For the light and airy buttercream, you'll require:
- 1 cup unsalted butter, softened
- 4 cups powdered sugar
- 2 to 3 tablespoons heavy cream or milk
- 1 teaspoon vanilla extract
- 1 pinch salt
This buttery concoction is where the magic truly happens!
Items Needed for Coloring and Decorating
To elevate your cupcakes with beautiful spring colors and festive decorations, gather:
- Pink, yellow, blue, and purple gel food coloring
- 20 marshmallow Peeps bunnies
- Colored sanding sugar or sprinkles (optional)
The vibrant colors will not only make your cupcakes eye-catching but also add a touch of joy to any celebration. Happy baking!
Step-by-Step Preparation of Easter Peeps Cupcakes
Creating delightful Easter Peeps Cupcakes is not just about baking; it's about spreading joy, embracing creativity, and making sweet memories. Let’s dive into the steps to craft these festive treats!
Prepare the Baking Pan and Preheat the Oven
First things first! Preheat your oven to 350°F (175°C). This is essential to ensure your cupcakes bake evenly and rise beautifully. While that’s warming up, grab your trusty 12-cup muffin tin and line it with colorful cupcake liners. If you have more batter, don’t forget to set out an additional pan. A cheerful setup makes all the difference!
Mix the Dry Ingredients for the Cupcake Batter
In a medium bowl, combine the all-purpose flour, unsweetened cocoa powder, and other dry ingredients like granulated sugar, baking soda, baking powder, and a pinch of salt. Whisk these together until they’re well blended. It ensures every bite of your Easter Peeps Cupcakes is deliciously uniform. Did you know that the ratio of cocoa to flour is crucial for achieving that rich chocolate flavor?
Combine Wet Ingredients and Create a Smooth Batter
Next, move on to mixing your wet ingredients. In the same bowl, add the egg, buttermilk, warm water (or hot coffee for the chocolate lovers), vegetable oil, and vanilla extract. Whisk until the batter is smooth and somewhat thin—this will keep the cupcakes light and fluffy. Fun tip: While whisking, feel free to take a moment to inhale that sweet aroma; it’s a precursor to the delicious experience ahead!
Fill the Cupcake Liners and Bake to Perfection
Now it's time to fill those cupcake liners! Scoop the batter into each liner, filling them about two-thirds full for the best rise. Pop these into your preheated oven and bake for about 18 to 20 minutes. A toothpick inserted should come out clean. The aroma in your kitchen will be heavenly!
Cool the Cupcakes Completely Before Frosting
Once baked, let the cupcakes rest in the pan for about 5 minutes—this helps them set a bit. Then, transfer them to a wire rack to cool completely. Trust me; frosted cupcakes are worth the wait! If you try to frost them too soon, you may end up with a melty mess.
Make the Creamy Vanilla Buttercream
While the cupcakes cool, prepare your luscious vanilla buttercream. Start by beating 1 cup of softened unsalted butter until creamy. Gradually mix in the powdered sugar, vanilla extract, and a pinch of salt, adding a tablespoon or two of heavy cream or milk as needed. Keep mixing until the frosting is fluffy and ready for piping.
Tint the Buttercream with Pastel Colors
Divide the buttercream into four bowls, and get creative with color! Using gel food coloring, tint each bowl a delightful pastel shade—think pinks, yellows, blues, and purples. This is where you really embrace the spring vibe! Using gel color ensures your frosting stays thick and creamy.
Pipe the Frosty Swirls onto the Cupcakes
Now comes the fun part! Transfer your colored buttercream into piping bags fitted with a large star tip. Pipe generous swirls onto the cooled cupcakes, letting your inner artist shine. If you can, create different styles for each color.
Decorate with Festive Peeps and Optional Sprinkles
Finally, finish off your Easter Peeps Cupcakes by placing a Peeps bunny right on top of each frosted delight. For an extra festive touch, sprinkle some colored sanding sugar or sprinkles around the bunny. This adds a pop of fun and whimsy!
Before you serve your masterpiece, remember that these cupcakes not only please the palate but brighten any gathering. So, are you ready to share some joyful moments with your Easter Peeps Cupcakes? Enjoy baking and don’t forget to invite some friends over for a sweet afternoon!
For additional tips on baking like a pro, you can check out resources from America's Test Kitchen and Food Network. Happy baking!
Variations on Easter Peeps Cupcakes
Chocolate Cupcakes Topped with Different Candy Decorations
Give your Easter Peeps Cupcakes a unique twist by experimenting with various candy decorations! Trade in the classic marshmallow bunnies for colorful chocolate eggs, jelly beans, or even mini chocolate bars. The combinations are endless! Consider pairing buttery caramel with chocolate frosting for an extra indulgent treat. Your guests will love the chance to sample different flavors and textures.
Alternative Flavors for the Buttercream Frosting
While vanilla buttercream is a delicious choice, why not mix it up? Try adding different flavors to your buttercream, like lemon zest or almond extract, for a fresh twist. You could even incorporate fun ingredients like coconut cream for a tropical touch. These variations will delight guests and provide a delightful surprise with each bite of your Easter Peeps Cupcakes.
For more decorating ideas, check out Food Network or Taste of Home.
Baking Tips and Notes for Easter Peeps Cupcakes
How to Achieve the Best Texture for Cupcakes
For the Easter Peeps Cupcakes, using room-temperature ingredients can make a world of difference. Make sure your egg and butter are softened properly to achieve that smooth, creamy batter that leads to fluffy, tender cupcakes. Don't forget to mix them just until combined — overmixing can lead to dense cupcakes! Finally, always allow your cupcakes to cool completely before frosting to maintain the buttercream's shape.
Recommendations for Storing and Freezing Cupcakes
To keep your delightful Easter Peeps Cupcakes fresh, store them in an airtight container at cool room temperature for up to one day. For longer storage, refrigerate them for up to three days. If you want to prep ahead, you can freeze unfrosted cupcakes for up to two months. Just thaw them before frosting for a fresh and delightful finish!
Serving Suggestions for Easter Peeps Cupcakes
Ideas for Presenting at Brunch or Holiday Gatherings
When it comes to showcasing your Easter Peeps Cupcakes, presentation is key! Arrange the cupcakes on a vibrant platter or tiered stand for an eye-catching centerpiece. Consider adding fresh spring flowers around the base or using colorful pastel table linens to enhance the festive vibe. For an extra touch, place small baskets filled with shredded grass as a charming backdrop.
Pairing with Beverages for a Festive Experience
Elevate your Easter Peeps Cupcakes by offering a delightful array of beverages. Pair them with sparkling lemonade or a refreshing iced tea for a fun, non-alcoholic option. If you prefer something cozy, consider serving them with a creamy vanilla latte or a fragrant herbal tea. These choices not only complement the sweetness of the cupcakes but also add a lovely spring touch to your gathering. For more pairing ideas, check out Epicurious for inspired drink recipes!
Time Breakdown for Easter Peeps Cupcakes
Preparation time estimate
Gather your ingredients and tools—it’ll take about 15 minutes to prepare everything for these delightful Easter Peeps Cupcakes. Don’t rush; take your time to enjoy the process!
Baking time estimate
Once your batter is ready, pop those cupcakes in the oven for 18 to 20 minutes. Just enough time to whip up some spring music playlists to get you in the festive mood!
Total time to enjoy these cupcakes
From start to finish, you’ll need approximately 45 minutes to create and admire your joyful creations. You might find yourself sticking around even longer, just to take in the delightful sight of those colorful toppings!
Nutritional Facts for Easter Peeps Cupcakes
Calories per cupcake
Each Easter Peeps Cupcake packs approximately 250 calories, making them a delightful treat for your spring festivities.
Breakdown of common nutrients
These cupcakes are not just fun to decorate; they also provide:
- Fat: About 12 grams
- Carbohydrates: 37 grams
- Protein: 3 grams
Despite the sweetness, a balanced approach means you can indulge without guilt. For more details on nutritional balance, check out ChooseMyPlate.gov.
FAQs on Easter Peeps Cupcakes
Can I make these cupcakes ahead of time?
Absolutely! Easter Peeps Cupcakes can be made a day in advance. After baking, just store the cooled cupcakes in an airtight container at room temperature. Frosting them the day of your event will ensure that the vanilla buttercream stays fluffy and vibrant, but if you're short on time, feel free to frost them ahead of time as well.
What alternatives can I use for buttermilk?
If you don’t have buttermilk on hand, don’t worry! You can easily make a substitute by mixing ½ cup of milk (dairy or non-dairy) with ½ tablespoon of lemon juice or vinegar. Let it sit for about 5 minutes until it thickens. This will give your Easter Peeps Cupcakes that nice, tender crumb but without the buttermilk.
How can I customize the decorations for a different occasion?
The beauty of Easter Peeps Cupcakes lies in their versatility! Simply swap out the Peep decorations for seasonal candies—like red or green candies for Christmas or heart-shaped sprinkles for Valentine’s Day. You can also change the color of the frosting or use themed cake toppers to fit any celebration. The possibilities are endless!
For more decorating inspiration, check out sites like Taste of Home and Wilton for creative ideas.
Conclusion on Easter Peeps Cupcakes
Creating Easter Peeps Cupcakes not only brings joy to your taste buds, but to your heart as well. These festive treats are a fun way to celebrate spring and make beautiful memories with loved ones. Don’t forget to share the joy! Happy baking and enjoy your delightful creations!
Easter Peeps Cupcakes: 10 Delicious Steps for Spring Joy
Equipment
- 12-cup muffin tin
- Mixing Bowls
- Whisk
- piping bags
- large star tip
Ingredients
For the Chocolate Cupcakes
- 1 cup all-purpose flour
- ½ cup unsweetened cocoa powder
- ¾ cup granulated sugar
- 1 teaspoon baking soda
- ½ teaspoon baking powder
- ¼ teaspoon salt
- 1 large egg
- ½ cup buttermilk
- ½ cup warm water or hot coffee
- ¼ cup vegetable oil
- 1 teaspoon vanilla extract
For the Vanilla Buttercream
- 1 cup unsalted butter, softened
- 4 cups powdered sugar
- 2 to 3 tablespoons heavy cream or milk
- 1 teaspoon vanilla extract
- 1 pinch salt
For Coloring and Decorating
- Pink gel food coloring
- Yellow gel food coloring
- Blue gel food coloring
- Purple gel food coloring
- 20 marshmallow Peeps bunnies
- Colored sanding sugar or sprinkles optional
Instructions
Preparation Steps
- Preheat your oven to 350°F. Line a 12-cup muffin tin with cupcake liners. Set out a second pan if needed for the remaining batter.
- In a medium bowl, whisk together the flour, cocoa powder, sugar, baking soda, baking powder, and salt until evenly combined.
- Add the egg, buttermilk, warm water or hot coffee, vegetable oil, and vanilla extract. Whisk until the batter is smooth and thin.
- Divide the batter evenly among the cupcake liners, filling each about two-thirds full. Bake for 18 to 20 minutes, or until a toothpick comes out clean.
- Let the cupcakes rest in the pan for 5 minutes. Transfer them to a wire rack and cool completely before frosting.
- Beat the softened butter until smooth and creamy. Gradually mix in the powdered sugar, vanilla, salt, and enough cream or milk to make a fluffy frosting.
- Divide the buttercream into 4 bowls. Tint one pink, one yellow, one blue, and one purple with gel food coloring.
- Transfer the frosting to piping bags fitted with a large star tip. Pipe generous swirls onto the cooled cupcakes.
- Place one Peeps bunny in the center of each frosted cupcake. Add sanding sugar or sprinkles if desired.
- Arrange the cupcakes on a tray and serve at room temperature for the best texture and flavor.

Leave a Reply