
Introduction to Pistachio Dream Bars
What are Pistachio Dream Bars and why you'll love them?
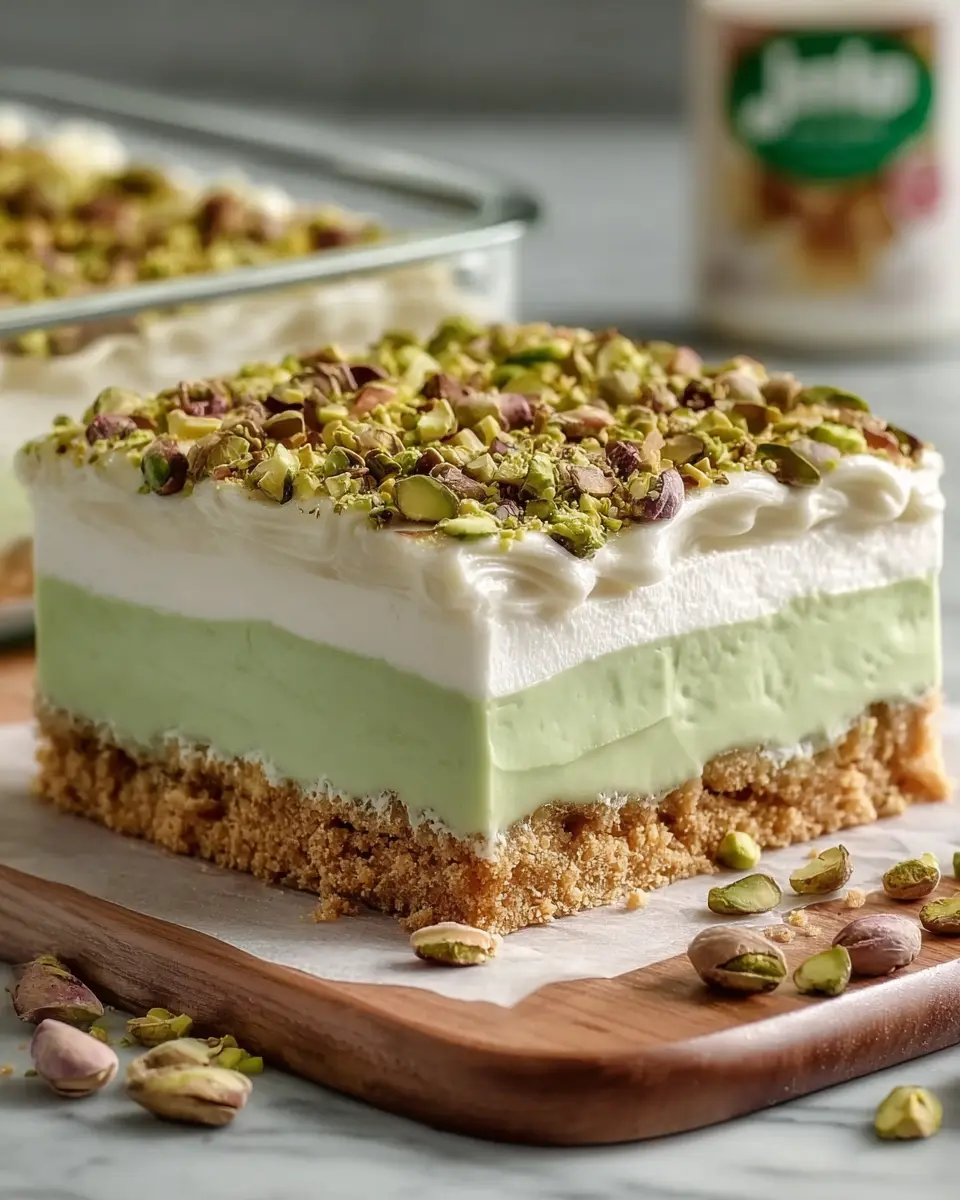
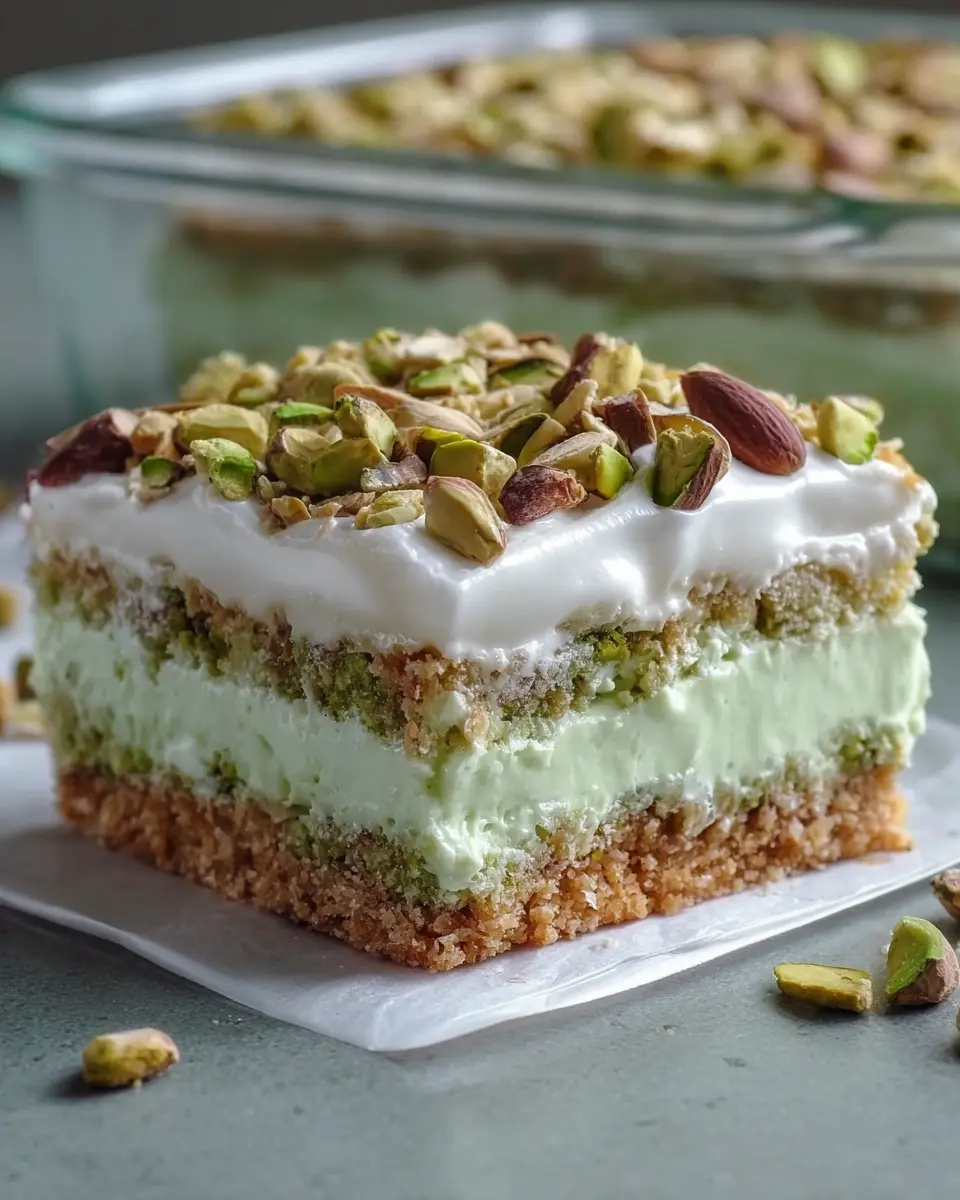
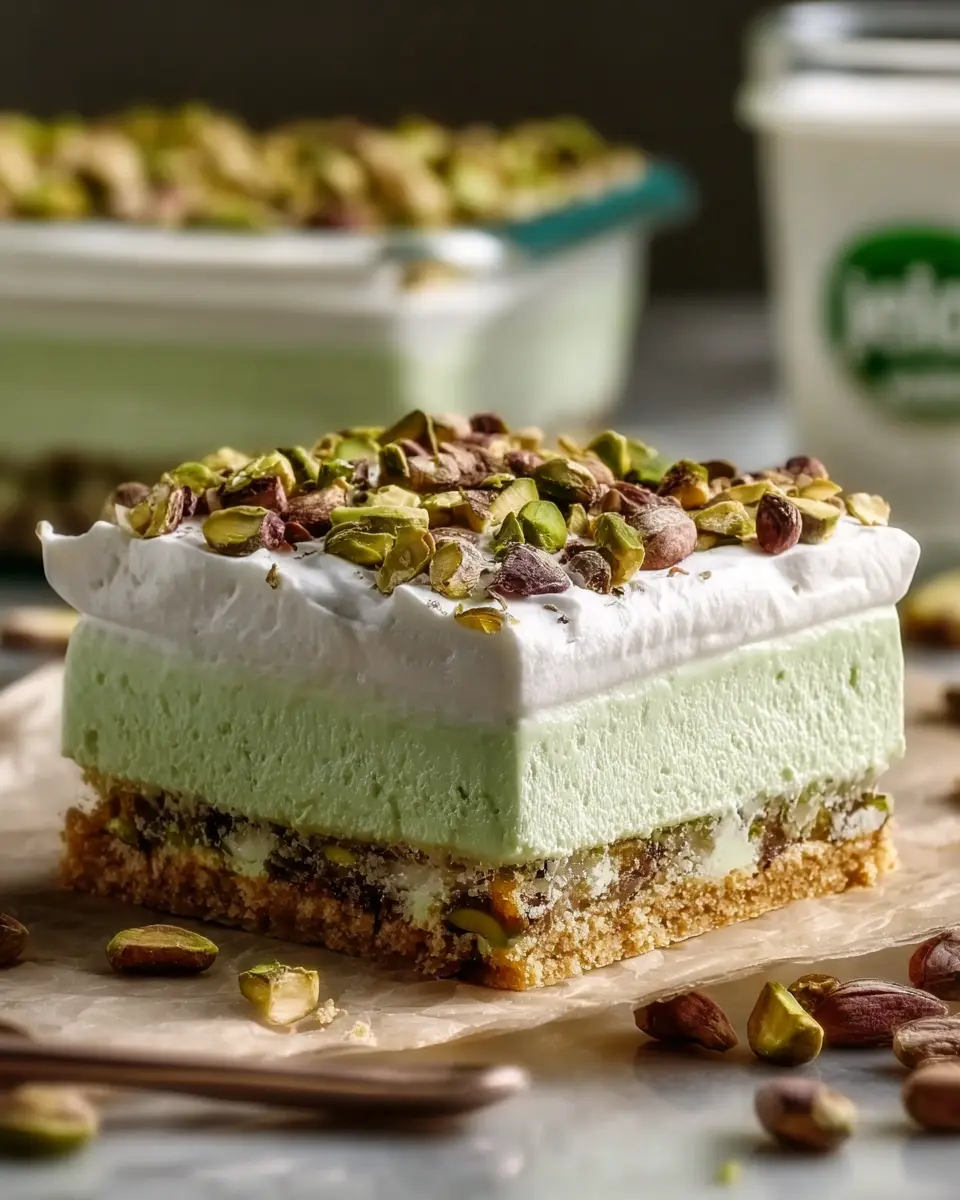
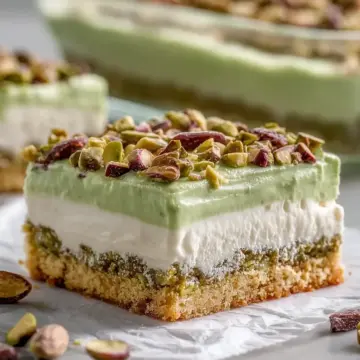
Pistachio Dream Bars are the epitome of layered dessert indulgence. Imagine sinking your teeth into creamy layers of buttery graham cracker crust, fluffy cream cheese, and a rich pistachio pudding center. Topped off with a light whipped topping and garnished with crunchy pistachios, these bars offer a delightful combination of textures that you won’t easily forget.
One of the best things about these bars is their versatility. Whether you’re gearing up for a spring potluck, hosting a summer barbecue, or simply craving a cool treat on a warm afternoon, Pistachio Dream Bars fit the bill perfectly. They’re easy to prepare and can be made ahead of time, making them a great option for busy professionals who still want to impress their friends and family.
But don't just take my word for it. A study published by the American Journal of Nutrition found that adding nuts, like pistachios, to your diet can contribute to better heart health. So, enjoy these bars with a touch of guilt-free pleasure! If you're captivated by their vibrant green hue and delicious flavors, stick with me as we explore how to make this dreamy dessert!
For more on the benefits of incorporating nuts into your diet, check out this resource from the Mayo Clinic.
Ingredients for Pistachio Dream Bars
Creating the perfect Pistachio Dream Bars starts with gathering the right ingredients. Here’s a handy overview of what you’ll need for each delicious layer of this delightful dessert.
Breakdown of the Crust Ingredients
The base of your bars features a beautifully crunchy crust. Combine:
- 2 cups graham cracker crumbs: Providing the perfect texture and flavor.
- 10 tablespoons salted butter, melted: This adds richness and helps bind the crust.
- ¼ cup shelled pistachios, finely chopped: A nod to the star of the dessert, enhancing nutty notes.
Essentials for the Cream Cheese Layer
Next up is the luxurious cream cheese layer. You will need:
- 16 ounces cream cheese, softened: The creaminess we all adore!
- ½ cup granulated sugar: Just the right amount of sweetness.
- 1 cup whipped topping: For lightness and airy texture.
Components for the Pistachio Pudding Layer
For a burst of pistachio flavor, gather:
- 2 boxes instant pistachio pudding mix (3.4 ounces each): This gives our bars that vibrant green hue and flavor.
- 2 ½ cups whole milk, cold: To create a creamy pudding consistency.
Topping Requirements
To finish your Pistachio Dream Bars on a high note, you’ll need:
- 3 cups whipped topping: It adds a final touch of lightness.
- ¼ cup shelled pistachios, chopped, for garnish: For that extra bit of crunch and aesthetic appeal!
With these ingredients at hand, you’ll be on your way to creating a dessert that not only looks stunning but tastes like a little slice of heaven. Happy baking!
Preparing Pistachio Dream Bars
Making Pistachio Dream Bars is a delightful journey that unfolds in simple yet gratifying steps. Not only are these bars a feast for the eyes with their vibrant green hues, but they also deliver creamy, nutty bliss in every bite. Plus, they are perfect for gatherings, potlucks, or just a sweet treat at home. Here’s a detailed guide on how to prepare these dreamy bars.
Create the Perfect Crust
Start by preheating your oven to 350°F. In a mixing bowl, combine 2 cups of graham cracker crumbs, 10 tablespoons of melted salted butter, and ¼ cup of finely chopped shelled pistachios. Mix it all until the texture resembles wet sand—this is your crust base! Then, firmly press this mixture into the bottom of a 9×13-inch baking dish. This establishes a strong foundation for the layers to come.
Bake and Let It Cool
Once you’re satisfied with the crust's thickness, pop it into the oven for about 8 to 10 minutes. You’ll know it’s done when it’s lightly set and aromatic. After baking, allow your crust to cool completely; this critical step ensures that the subsequent layers don’t melt away into a gooey mess.
Craft the Cream Cheese Layer
In a separate bowl, beat together 16 ounces of softened cream cheese and ½ cup of granulated sugar until smooth and creamy. Next, gently fold in 1 cup of whipped topping. This will create a fluffy cream cheese layer that adds a rich, decadent twist to your Pistachio Dream Bars.
Layer It Up
Carefully spoon the cream cheese mixture over your cooled crust, spreading it evenly with a spatula. The idea is to maintain separate layers, which not only enhances presentation but also balances flavor.
Whip Up the Pistachio Layer
For the vibrant pistachio center, whisk together two boxes (3.4 ounces each) of instant pistachio pudding mix and 2 ½ cups of cold whole milk. Stir for about 2 minutes until the mixture thickens to a spreadable consistency.
Assemble the Pistachio Layer
Gently spread the prepared pistachio pudding mixture over the cream cheese layer. Smooth out the top with care to keep those distinct layers intact.
Add the Finishing Touches
Now it’s time for the topping! Spread 3 cups of whipped topping evenly over the pistachio layer. For a delightful crunch, sprinkle chopped pistachios on top, adding both texture and flavor.
Chill and Set
Chill your Pistachio Dream Bars in the refrigerator for at least 4 hours, or until fully set. This time allows the flavors to meld beautifully.
Slice and Enjoy
Once chilled, cut these delicious bars into squares or rectangles. Serve them cold to experience the maximum creamy texture. These bars will surely be a hit at any gathering!
Pro tip: For easier slicing, wipe your knife between cuts to maintain clean edges. Feel free to check out resources such as Taste of Home or American Pistachio Growers for more tips and delicious variations!
Variations on Pistachio Dream Bars
Nut-free Version
If you're looking to make a nut-free version of these delightful Pistachio Dream Bars, simply omit the chopped pistachios in the crust and garnish. You can enhance the flavor with a splash of vanilla extract or a hint of almond extract instead—just be sure to use almond-free ingredients if allergens are a concern! Substituting the graham cracker crust with crushed cookie varieties, like Oreos, can also elevate the taste while keeping it nut-safe.
Alternative Pudding Flavors
Feel free to play around with flavors! Instead of the classic pistachio pudding, why not try chocolate, vanilla, or even banana pudding for a new twist? Each variation brings its own unique flavor profile, transforming the bars into a completely different dessert experience. Pairing a chocolate bottom layer with vanilla pudding on top is a fabulous way to satisfy both chocolate lovers and vanilla enthusiasts alike!
Whichever variation you choose, these Pistachio Dream Bars are sure to impress! For more ideas, check out Food Network's pudding options for inspiration.
Cooking tips and notes for Pistachio Dream Bars
Achieving the perfect crust
To make irresistibly delicious Pistachio Dream Bars, start with the perfect crust. Ensure your graham cracker crumbs are finely crushed and mix them thoroughly with the melted butter and finely chopped pistachios. Press the mixture firmly into your baking dish to create a sturdy base. For further crispiness, bake the crust until light golden, just 8 to 10 minutes, then let it cool completely. This step is essential for maintaining distinct layers.
Ensuring smooth layers
For a luxurious texture, let your cream cheese soften at room temperature before mixing. This simple trick prevents lumps in the cream cheese layer. When adding the next layers, spread each one gently with a spatula to maintain clarity between them. As a tip, chill overnight for cleaner slices — patience pays off! Enjoy your creamy creation!
Serving Suggestions for Pistachio Dream Bars
Pairing with Beverages
To elevate your Pistachio Dream Bars, consider pairing them with refreshing beverages. I recommend serving these creamy delights alongside:
- Iced Green Tea: The subtle earthiness complements the pistachio flavor.
- Sparkling Water with a Splash of Lime: This adds a zesty twist that cuts through the creaminess.
- Coffee or Espresso: The bitterness of coffee beautifully balances the sweetness of the bars.
These pairings not only enhance the dessert experience but also provide a delightful contrast of flavors!
Presenting at Gatherings
When it comes to serving Pistachio Dream Bars at gatherings, presentation is key. Here are some tips to wow your guests:
- Use Colorful Plates: Contrast the soft green hue of the bars with vibrant-colored dishes for visual appeal.
- Garnish Thoughtfully: A sprinkle of chopped pistachios or edible flowers can take your dessert to the next level.
- Portion Wisely: Cut them into bite-sized squares for easy serving and to encourage guests to try more than one.
These simple touches can make your dessert the star of any event! For more presentation inspiration, check out this guide on dessert plating.
Time Details for Pistachio Dream Bars
Preparation Time
Getting started with your Pistachio Dream Bars is a breeze! You’ll need about 30 minutes for preparation. This includes mixing the crust and layers, so gather your ingredients and let's dive in.
Chilling Time
Once assembled, it’s crucial to let those layers meld in the fridge. Set aside at least 4 hours for chilling. If you can wait longer, overnight is even better!
Total Time
Altogether, from prep to chilling, you are looking at a total of 4 hours and 35 minutes. But trust us, the delicious end result will make the wait totally worthwhile!
Ready to whip up these delightful Pistachio Dream Bars? Don't forget to check out our recommended kitchen gadgets to make your preparation even easier! Enjoy making your way to creamy bliss!
Nutritional Information for Pistachio Dream Bars
Calories per bar
Each delicious Pistachio Dream Bar contains approximately 250 calories. This makes them a delightful treat without straying too far from your dietary goals.
Key nutrients
These bars are not just tasty but also provide essential nutrients, including:
- Protein: 4g
- Fat: 18g (including healthy fats from pistachios)
- Carbohydrates: 27g
- Fiber: 1g
Dietary considerations
Ideal for vegetarians, Pistachio Dream Bars can be modified for those seeking gluten-free options by using gluten-free graham crackers. However, for those with nut allergies, it’s best to skip the pistachios. Enjoy this creamy dessert guilt-free, knowing you’re indulging in a treat packed with flavor and nutrition! For more on healthy desserts, check out this article on nutritional baking tips.
FAQs about Pistachio Dream Bars
How long can I store leftover bars?
These delightful Pistachio Dream Bars can be stored in the refrigerator for up to 5 days. Just make sure to cover them well with plastic wrap or keep them in an airtight container to maintain their creamy texture.
Can I use fresh pistachios instead of chopped?
Absolutely! Fresh pistachios can add an earthy flavor and a delightful crunch. Just be sure to chop them finely so they mix well into the layers and fit into the overall texture of your Pistachio Dream Bars.
What can I use instead of whipped topping?
If you prefer a more natural option, consider using stabilized homemade whipped cream. For a dairy-free version, coconut whipped cream works wonderfully and adds a subtle hint of flavor that complements the pistachio perfectly. (For a step-by-step guide on making homemade whipped cream, check out this article.)
If you have any more questions or tips, feel free to share in the comments below!
Conclusion on Pistachio Dream Bars
Final thoughts and encouragement to try the recipe
If you’re looking for a refreshing treat that’s sure to impress, Pistachio Dream Bars are your answer! This delightful dessert combines layers of rich flavors and textures, making it perfect for any occasion. Don’t hesitate—give this recipe a try and indulge in every creamy bite!
Pistachio Dream Bars: 5 Simple Layers for Creamy Bliss
Equipment
- 9x13-inch Baking Dish
- mixing bowl
- Whisk
- spatula
Ingredients
For the Crust
- 2 cups graham cracker crumbs
- 10 tablespoons salted butter melted
- ¼ cup shelled pistachios finely chopped
For the Cream Cheese Layer
- 16 ounces cream cheese softened
- ½ cup granulated sugar
- 1 cup whipped topping
For the Pistachio Layer
- 2 boxes instant pistachio pudding mix 3.4 ounces each
- 2 ½ cups whole milk cold
For the Topping
- 3 cups whipped topping
- ¼ cup shelled pistachios chopped, for garnish
Instructions
Prepare the Crust
- Preheat oven to 350°F.
- Mix graham cracker crumbs, melted butter, and finely chopped pistachios in a bowl until the texture looks like wet sand.
- Press the mixture firmly into the bottom of a 9×13-inch baking dish.
Bake and Cool
- Bake the crust for 8 to 10 minutes, until lightly set and fragrant.
- Remove from the oven.
- Cool completely before adding the next layer.
Make the Cream Cheese Layer
- Beat softened cream cheese and sugar until smooth and creamy.
- Fold in 1 cup whipped topping until light and fluffy.
Spread the Cream Cheese Layer
- Spoon the cream cheese mixture over the cooled crust.
- Spread gently into an even layer.
Prepare the Pistachio Layer
- In another bowl, whisk together the instant pistachio pudding mix and cold milk for about 2 minutes.
- Mix until thickened but still spreadable.
Add the Pistachio Layer
- Carefully spread the pistachio pudding mixture over the cream cheese layer.
- Smooth the top gently to keep the layers neat.
Add the Topping
- Spread the remaining whipped topping over the pistachio layer.
- Smooth into a soft, even top layer.
Chill and Finish
- Refrigerate for at least 4 hours, or until fully set.
- Sprinkle chopped pistachios over the top before serving.
Slice and Serve
- Cut into squares or bars.
- Serve chilled for the best creamy texture.
Leave a Reply